Connect DeepSeek Harness to Tokatlas
This guide connects the Harness Web UI to the Tokatlas Chat Completions API. Choose a model that your Tokatlas account can access and that supports tool calling for agent tasks.
1. Prepare Your Environment
Install Node.js 24 from the official download page, prepare a Tokatlas API key, and identify an available Chat model in your Tokatlas model list. Reopen your terminal after installing Node.js.
node --version
npm --version
Node.js 24 is the baseline used in this guide. For another runtime version, check the package requirements before installing:
npm view @deepseek-ai/dsh engines2. Install and Launch Harness
Run these commands in macOS/Linux Terminal or Windows PowerShell:
npm install -g @deepseek-ai/dsh
dsh web
Open the local address printed by the terminal, normally http://127.0.0.1:3080. For a launch without a global installation, use:
npx @deepseek-ai/dsh webFor project work, change into your project directory before launching Harness.
3. Add Tokatlas
Open Settings → Models → Add model provider → Custom model API, then fill in:
| Field | Value |
|---|---|
| Provider ID | tokatlas |
| Display name | Tokatlas |
| Base URL | https://api.tokatlas.ai/v1 |
| API protocol | OpenAI Chat Completions (openai-completions) |
| API key | Your Tokatlas API key |
| Model ID | An enabled Tokatlas Chat model ID |
Use Fetch available models if available, select the needed models, and save the provider. If discovery fails, enter the exact model ID from Tokatlas manually.
Base URL
Include /v1 once. Do not append /chat/completions in the provider form; Harness appends the request path.
Locate the controls
After adding a provider in Settings → Models, switch to Custom model API. Replace the upstream placeholders with the Tokatlas values in this guide.
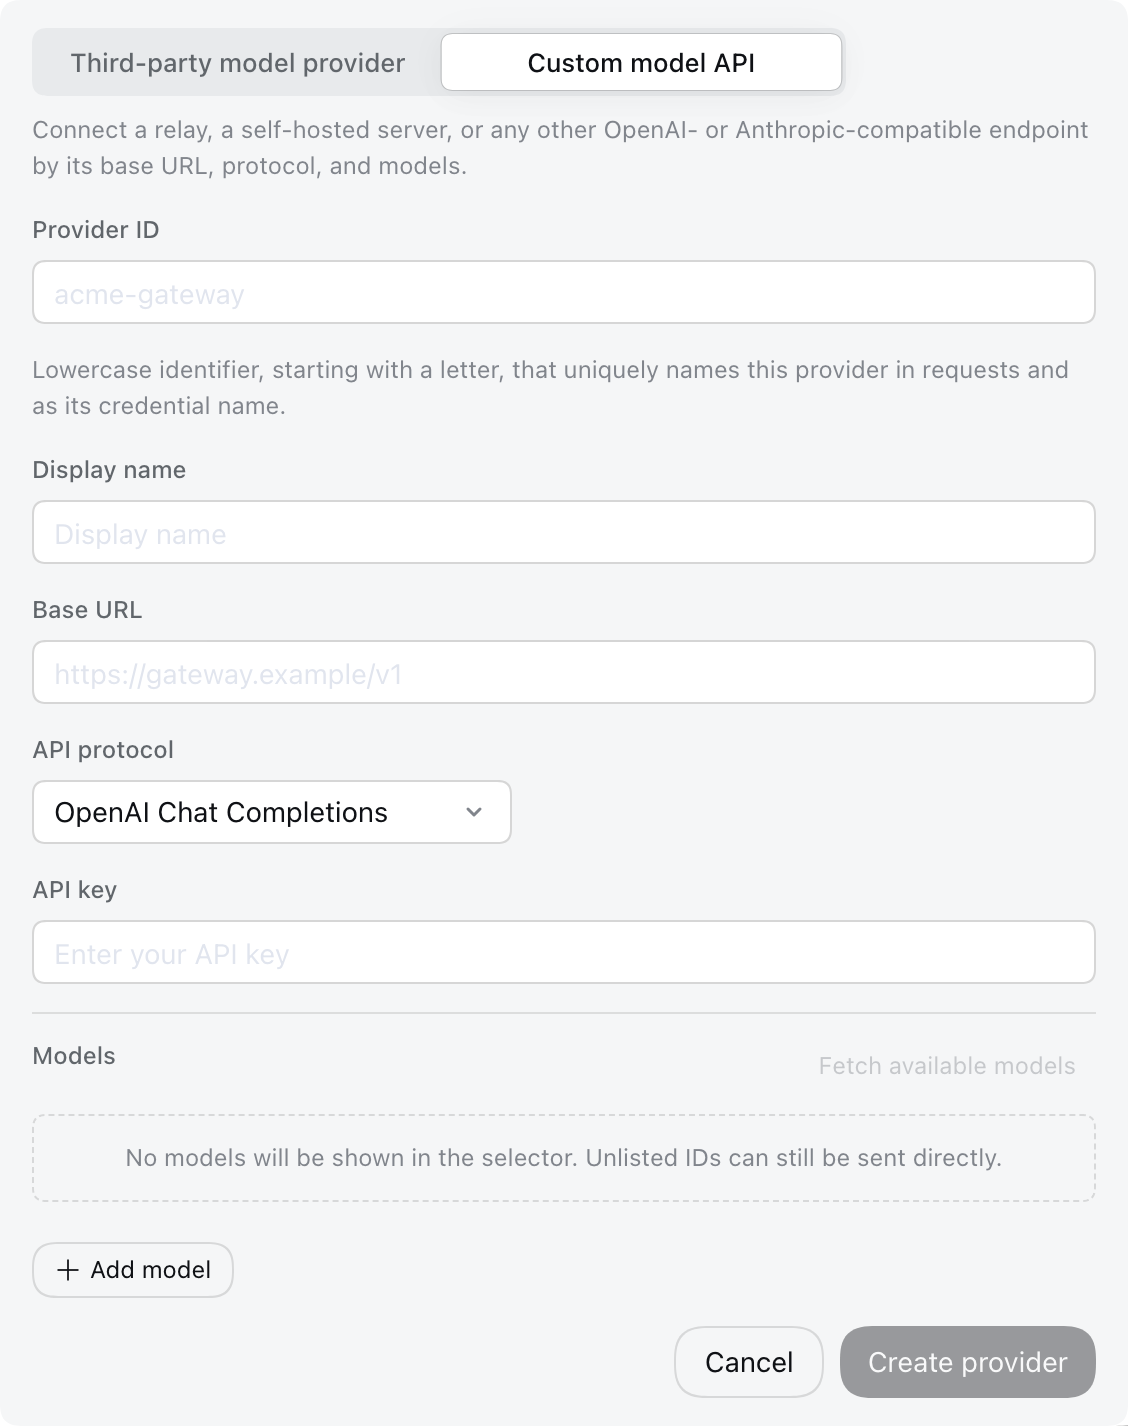
Screenshot source: DeepSeek Harness official documentation (unmodified; the interface may vary by version).
4. Verify a Conversation
Select Tokatlas and your configured model in the model picker. Create a new session and send:
Reply with OK only.Check that a response arrives without authentication or model errors. A text reply confirms the basic connection; also try a small project task to verify tool calling before relying on the agent workflow.
5. Add or Switch Models
Add models to the Tokatlas provider and select one in a new session. Existing sessions may retain their previous selection. Model availability and billing follow your Tokatlas account; adding a model name locally does not enable it.
Configuration Versions
Current upstream documentation uses the Models interface and profile-specific cordis.patch.yml. Older releases used settings.yaml; avoid mixing their configuration layouts. Follow the documentation matching your installed release.
Advanced provider fields include api, baseURL, apiKeyEnv, and models. If configuring credentials through the environment, use your own TOKATLAS_API_KEY variable and reference it from apiKeyEnv. Back up the active configuration before manual edits and preserve other providers.
Troubleshooting
| Symptom | Action |
|---|---|
dsh not found | Reopen the terminal or launch with npx @deepseek-ai/dsh web. |
| Runtime installation error | Check node --version against the package engines. |
401 / invalid key | Re-enter the complete Tokatlas key without surrounding whitespace. |
403 / access denied | Check account and model permissions. |
404 | Check the Base URL and selected API protocol. |
| Model not found | Copy the exact ID of an enabled model; save and start a new session. |
| Text works, agent tasks fail | Confirm model tool support and inspect the reported request error. |
429 | Reduce concurrency and retry with backoff. |
| Browser does not open | Use the local address printed by Harness. |